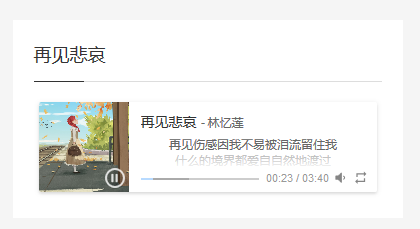
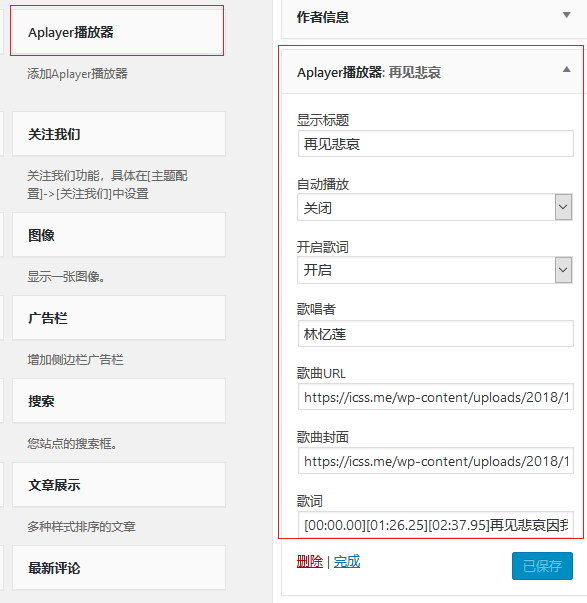
Aplayer的音乐播放器界面确实好看,所以决定也弄一个,最终整合到侧边栏的小工具上,这样方便在不同的地方调用不同的音乐
先看看效果图:
Aplayer.js
以下是制作widget小工具的全部代码,把以下代码存为:widget-aplayer.php
以下是制作widget小工具的全部代码,把以下代码存为:widget-aplayer.php
|
1
2
3
4
5
6
7
8
9
10
11
12
13
14
15
16
17
18
19
20
21
22
23
24
25
26
27
28
29
30
31
32
33
34
35
36
37
38
39
40
41
42
43
44
45
46
47
48
49
50
51
52
53
54
55
56
57
58
59
60
61
62
63
64
65
66
67
68
69
70
71
72
73
74
75
76
77
78
79
80
81
82
83
84
85
86
87
88
89
90
91
92
93
94
95
96
97
98
99
100
101
102
103
104
105
106
107
108
109
110
111
112
113
114
115
116
117
118
119
120
121
122
123
124
125
126
127
128
129
130
131
132
133
134
135
136
|
<?php
add_action('widgets_init', 'widgetaplayerInit');
function widgetaplayerInit() {
register_widget('widgetaplayer');
}
class widgetaplayer extends WP_Widget {
/**
* widgetProfile setup
*/
function widgetaplayer() {
$widget_ops = array('classname' => 'widget-aplayer', 'description' => '添加Aplayer播放器');
// init widgetProfile
parent::__construct('widget-aplayer', "Aplayer播放器", $widget_ops);
}
/**
* How to display the widgetProfile on the screen.
*/
function widget( $args, $instance ) {
extract( $args );
/* Our variables from the widget settings. */
$title = apply_filters('widget_name', $instance['title'] );
$type = $instance['type'];
$gs = $instance['gs'];
$auto = $instance['auto'];
$auto = $instance['auto'];
$url = $instance['url'];
$pic = $instance['pic'];
$word = $instance['word'];
echo $before_widget;
echo $this->showWidget($title,$type,$gs, $auto, $url, $pic,$word);
echo $after_widget;
}
/**
* Update the widget settings.
*/
function update( $new_instance, $old_instance ) {
$instance = $old_instance;
/* Strip tags for title and name to remove HTML (important for text inputs). */
$instance['title'] = strip_tags( $new_instance['title'] );
$instance['type'] = strip_tags( $new_instance['type'] );
$instance['gs'] = strip_tags( $new_instance['gs'] );
$instance['auto'] = strip_tags( $new_instance['auto'] );
$instance['url'] = strip_tags( $new_instance['url'] );
$instance['pic'] = strip_tags( $new_instance['pic'] );
$instance['word'] = strip_tags( $new_instance['word'] );
return $instance;
}
/**
* Displays the widget settings controls on the widget panel.
* Make use of the get_field_id() and get_field_name() function
* when creating your form elements. This handles the confusing stuff.
*/
function form( $instance ) {
/* Set up some default widget settings. */
$defaults = array(
'title' => '',
'type' => 'true',
'gs' => 'true',
'auto' => '',
'url' => '',
'pic' => '',
'word' => ''
);
$instance = wp_parse_args( (array) $instance, $defaults ); ?>
<!-- widget title: -->
<p>
<label for="<?php echo $this->get_field_id( 'title' ); ?>">显示标题</label>
<input type="text" id="<?php echo $this->get_field_id( 'title' ); ?>" name="<?php echo $this->get_field_name( 'title' ); ?>" value="<?php echo $instance['title']; ?>" style="width:100%;" />
</p>
<p>
<label for="<?php echo $this->get_field_id( 'type' ); ?>">自动播放</label>
<select id="<?php echo $this->get_field_id( 'type' ); ?>" name="<?php echo $this->get_field_name( 'type' ); ?>" class="widefat" style="width:100%;">
<option value="true" <?php if ( 'true' == $instance['type'] ) echo 'selected="selected"'; ?>>开启</option>
<option value="false" <?php if ( 'false' == $instance['type'] ) echo 'selected="selected"'; ?>>关闭</option>
</select>
</p>
<p>
<label for="<?php echo $this->get_field_id( 'gs' );?>">开启歌词</label>
<select id="<?php echo $this->get_field_id( 'gs' ); ?>" name="<?php echo $this->get_field_name( 'gs' ); ?>" class="widefat" style="width:100%;">
<option value="true" <?php if ( 'true' == $instance['gs'] ) echo 'selected="selected"'; ?>>开启</option>
<option value="false" <?php if ( 'false' == $instance['gs'] ) echo 'selected="selected"'; ?>>关闭</option>
</select>
</p>
<p>
<label for="<?php echo $this->get_field_id( 'auto' ); ?>">歌唱者</label>
<input type="text" id="<?php echo $this->get_field_id( 'auto' ); ?>" name="<?php echo $this->get_field_name( 'auto' ); ?>" value="<?php echo $instance['auto']; ?>" style="width:100%;" />
</p>
<p>
<label for="<?php echo $this->get_field_id( 'url' ); ?>">歌曲URL</label>
<input type="text" id="<?php echo $this->get_field_id( 'url' ); ?>" name="<?php echo $this->get_field_name( 'url' ); ?>" value="<?php echo $instance['url']; ?>" style="width:100%;" />
</p>
<p>
<label for="<?php echo $this->get_field_id( 'pic' ); ?>">歌曲封面</label>
<input type="text" id="<?php echo $this->get_field_id( 'pic' ); ?>" name="<?php echo $this->get_field_name( 'pic' ); ?>" value="<?php echo $instance['pic']; ?>" style="width:100%;" />
</p>
<p>
<label for="<?php echo $this->get_field_id( 'word' ); ?>">歌词</label>
<input type="text" id="<?php echo $this->get_field_id( 'word' ); ?>" name="<?php echo $this->get_field_name( 'word' ); ?>" style="width:100%;" value="<?php echo $instance['word']; ?>" />
</p>
<?php
}
function showWidget($title,$type,$gs, $auto, $url, $pic, $word) {
?>
<link href="<?php echo get_template_directory_uri().'/aplayer/APlayer.min.css'?>" rel="stylesheet">
<script src="<?php echo get_template_directory_uri().'/aplayer/APlayer.min.js'?>"></script>
<div class="widget-title"><?php echo $title ?></div>
<div id="player1">
<pre class="aplayer-lrc-content">
<?php echo $word ?>
</pre>
</div>
<script>
var ap = new APlayer
({
element: document.getElementById('player1'),
narrow: false,
autoplay: <?php echo $type ?>,
showlrc: <?php echo $gs ?>,
music: {
title: '<?php echo $title ?>',
author: '<?php echo $auto ?>',
url: '<?php echo $url ?>',
pic: '<?php echo $pic ?>'
}
});
ap.init();
</script>
<?php }
}?>
|
其中这二句是引用了Aplayer的JS与CSS
|
1
2
|
<link href="<?php echo get_template_directory_uri().'/aplayer/APlayer.min.css'?>" rel="stylesheet">
<script src="<?php echo get_template_directory_uri().'/aplayer/APlayer.min.js'?>"></script>
|
这二句我是放在我的主题文件夹下的,你也可以直接引用官方的Aplayer的js与css
最后在function.php引用这个文件:widget-aplayer.php
include(TEMPLATEPATH。'/ template-parts / widget / widget-aplayer.php');
在后台外观-小工具中选择Aplayer播放器
这样一个小工具就做好了,可以放在侧边栏的任何位置,目前在设置歌曲的URL与封面时,都是手动粘地址,好想直接多媒体库中添加多好,暂时还不会怎么关联媒体库,有知道的肯请粘上代码。


 glzjin's blog
文章评论